Men Of Valor

Hey, you like what you see? If you think your fit to be part of MoV, take a minute to register and post an intro/application.

We have one large division for MAG, but have just started our brand new BC2 and MoH Divisions!

Thanks, staff of MoV

Join the forum, it's quick and easy

Men Of Valor

Hey, you like what you see? If you think your fit to be part of MoV, take a minute to register and post an intro/application.

We have one large division for MAG, but have just started our brand new BC2 and MoH Divisions!

Thanks, staff of MoV

Men Of Valor

Would you like to react to this message? Create an account in a few clicks or log in to continue.
Welcome to M.o.V.
***NEW WEBSITE: http://menofvalorgaming.enjin.com/ ***
*** VISIT MoV AT OUR NEW WEBSITE ***

+4
SdgRaven
MarcusTheCarcus
needswall
Brashin
8 posters

    MAG RAVEN Acquisition Attack Strategy

    Brashin
    Brashin
    Sergeant First Class
    Sergeant First Class


    Posts : 309
    Join date : 2010-02-18
    Age : 46

    MAG RAVEN Acquisition Attack Strategy Empty MAG RAVEN Acquisition Attack Strategy

    Post by Brashin Tue Apr 20, 2010 6:53 am

    Does anyone have an overhead map view that shows the locations of the bunkers, mortar, AA, sensor, motor pool, etc that we can use to create strategies on?

    The ones on the official MAG forum suck as its just an overhead map but nothing is called out so to me they are pretty much useless. Would also like to know what side Platoon 1 and 2 are on and where each squad spawns at.

    I have looked around and have found nothing although I don't know all the best places to look, so any help would be appreciated.
    needswall
    needswall
    Sergeant First Class
    Sergeant First Class


    Posts : 300
    Join date : 2010-03-01
    Age : 44
    Location : Vietnam

    MAG RAVEN Acquisition Attack Strategy Empty Re: MAG RAVEN Acquisition Attack Strategy

    Post by needswall Tue Apr 20, 2010 11:16 pm

    Brashin, I have created what I think is an accurate map showing bunkers, AA, etc. Not sure how it is going to show up on the site, or how clear everything will be, let me know.

    MAG RAVEN Acquisition Attack Strategy Acquis10
    needswall
    needswall
    Sergeant First Class
    Sergeant First Class


    Posts : 300
    Join date : 2010-03-01
    Age : 44
    Location : Vietnam

    MAG RAVEN Acquisition Attack Strategy Empty Re: MAG RAVEN Acquisition Attack Strategy

    Post by needswall Tue Apr 20, 2010 11:18 pm

    At the very least, someone who knows what they are doing with image design programs (Raven maybe) could use this to make a better looking one. Appears to have worked so will load for SVER and Valor as well.
    MarcusTheCarcus
    MarcusTheCarcus
    Private
    Private


    Posts : 36
    Join date : 2010-02-13
    Age : 43
    Location : Gillette, Wyoming

    MAG RAVEN Acquisition Attack Strategy Empty Re: MAG RAVEN Acquisition Attack Strategy

    Post by MarcusTheCarcus Wed Apr 21, 2010 11:12 pm

    It's nice to see a map with all the bunkers marked on it. I honestly didn't know where the enemy transports were located on this map. Thanks for the map.
    Brashin
    Brashin
    Sergeant First Class
    Sergeant First Class


    Posts : 309
    Join date : 2010-02-18
    Age : 46

    MAG RAVEN Acquisition Attack Strategy Empty Re: MAG RAVEN Acquisition Attack Strategy

    Post by Brashin Thu Apr 22, 2010 11:33 am

    Some thoughts on this map:

    If we spawn on the right side of the map (not sure what platoon) then depending on how many squads we have I would say no more than 2 full mov squads make a major push on either left or right side bunker. If we have a 3rd squad they go right up the gut to keep Raven's defense honest. Once left/right side bunker is down we need to then sweep towards the center of the map knocking out each bunker in turn till we get to the gate.

    From there 1 Squad will be responsible for taking down the AA while the other squad works to take the 4th bunker on either the far left/right side (whichever side we didn't go after in the begining).

    Once the AA goes down 1 squad will be responsible for the rest of the game to defending it and ensuring the 2 bunkers next to the gate are down. That squad should split into 2 Fire teams with FT1 watching the AA and FT2 the bunkers & Gate. when either FT encounters the enemy the call goes out for support by the other FT. That will be the squads entire goal to keep the AA and bunkers by the gate down.

    From there the other squads should make their way further into the map 1 Squad should focus solely on grabbing the vehicles. With Ft1 going for the APC while FT 2 goes to take out the roadblocks.

    If we have another squad or partial squad I would se them going to remove the mortar batteries if they can. If its a full squad then FT 1 goes to take out mortar battery while FT 2 goes to assist in knocking out roadblocks so the APC's can get out.

    We need guys with Rockets and Med-kits for this battle. Everyone should have either 1 or the other and preferably both. Rockets for the turrets and enemy vehicles while med-kit to bring guys up quickly.

    When assualting a bunker a SL should clearly communicate to his squad that FT1 will plant the charge and FT 2 will protect, this way everyone doesnt rush in and get wasted. There will be times when a SL says everyone rush in but in the begining keep some guys in reserve to provide cover and have them move in to rez should FT1 go down. I use FT1 and 2 above in my examples that doesn't necessarily mean those are the exact FT's that should do the job, the SL might want FT2 to plant and FT1 to protect just using as an example.

    Thoughts
    SdgRaven
    SdgRaven
    MoV Artist
    MoV Artist


    Posts : 97
    Join date : 2010-03-08
    Age : 39
    Location : Michigan

    MAG RAVEN Acquisition Attack Strategy Empty Re: MAG RAVEN Acquisition Attack Strategy

    Post by SdgRaven Thu Apr 22, 2010 3:28 pm

    Ok I've Been A Little Busy

    But I Have Made A Raven Acquisition Zoomable Map With Map Markers

    I Will Continue To Make Sver And Valor Acquisition Maps

    To See This Map And Others In The Future Visit http://ravenscustoms.moonfruit.com/#/raven-acquisition-map/4540436693

    I Will Continue To Make Maps

    Any Input To Further The Effectiveness Of These Maps Please Let Me Know

    Left Side Of Raven's Acquisition Map

    MAG RAVEN Acquisition Attack Strategy Left_s12

    1. Squad Takes Out Turret On The Left Side Bunker Than Blow Up The Bunker
    2. As Moving From 1 Take Out The Blockade On The Way Towards 3
    3. On This Bunker You May Not Have A Chance To Take Out The Turret But Rush In And Take This Bunker

    4 FT1. Fire Team 1 Spilts From The Pack At This Point To Take Down The AA
    4 FT2. Fire Team 2 After Taking 3 Move Towards The Next Bunker And Take It Down
    5 FT1. Fire Team 1 Moves Toward The Transport Moving On The Left Side And Moving Slow When You Get Close To Sensor Array (No Sprinting) Take Out Blockade
    5 FT2. Fire Team 2 Will Need To Take Out This Last Bunker To Clear A Path For The Transport
    6&7. FT1. Fire Team 1 Will Split And Two Men Will Take This Other Blockade As The Other Two Move To Capture The Transport
    6&7. FT2. Fire Team 2 Will Take Out Blockade And The Gate To Secure Opening For Transport


    This Should Work If Multi Squads Are In The Match


    Last edited by SdgRaven on Fri Apr 23, 2010 4:08 pm; edited 2 times in total
    HeeroBlaze
    HeeroBlaze
    Private
    Private


    Posts : 31
    Join date : 2010-04-07
    Location : USA

    MAG RAVEN Acquisition Attack Strategy Empty Re: MAG RAVEN Acquisition Attack Strategy

    Post by HeeroBlaze Thu Apr 22, 2010 6:18 pm

    Like my post on the Valor ACQ Defense Thread, I'm going to try to develop some proper loadouts for Raven/SVER's ACQ maps. I'm, also going to recommend certain skills and equipment to have that can be applied to anyone.

    After some thought, it seems like there needs to be two different loudouts when attacking, the one before the Bunkers and AAA go down and one for after. Here is what I've got so far. For the first part, I'm not going to distinguish between the APC squads and the non-APC squads, because those APCs are too easily destroyed in the beginning, though in the right places they can serve as forward spawn points. Also, as usual EVERYONE needs a Medical Kit and do invest in Improved Healing and Improved Resuscitation.

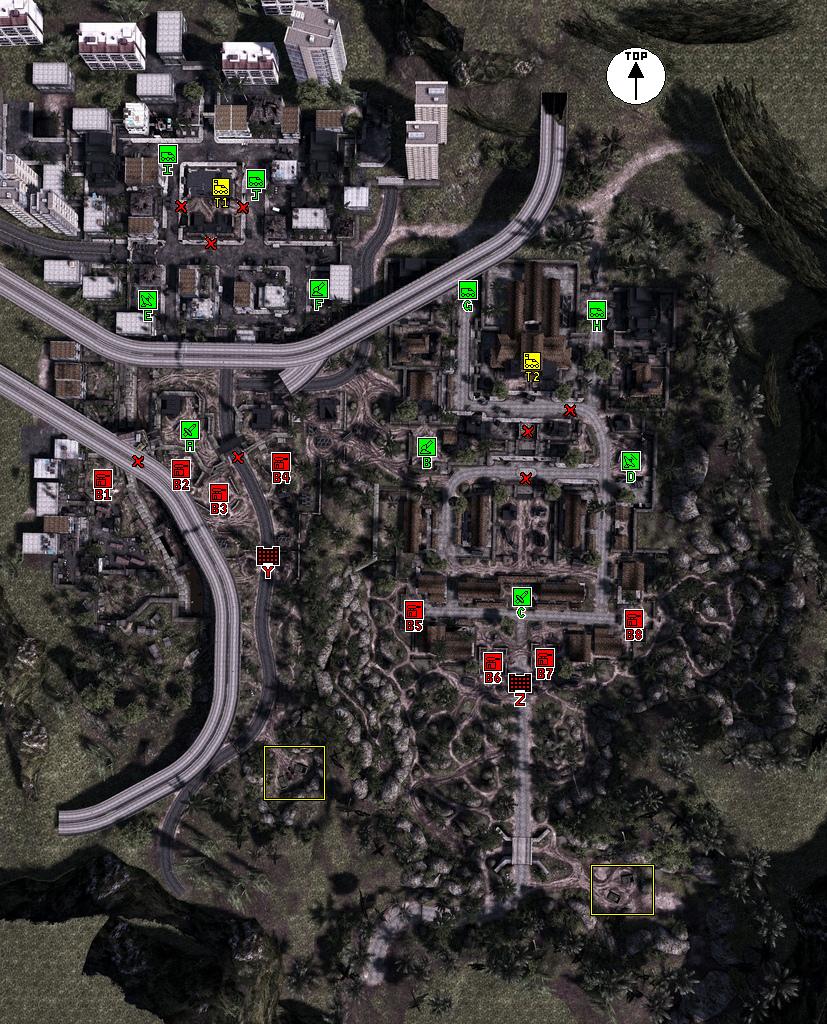
    Attacking Bunkers Loadout:
    x3 Rockemen
    x2 Grenadiers
    x2 Machine Gunners (Other players can also have LMGs, but we need at least two. Machine Gunners can carry Grenades and Rocket Launchers as well.)
    x1 Poison Gas Grenadier

    Here are the reasons.
    1) We have to get those turrets down. Running up to a bunker with a turret is suicidal and counterproductive. If we have three Rocketmen firing at it and each is able to get one shot in, that is enough to get it down fast and move on.

    2) Once we get the turret down, we need to clear the bunker of enemy troops. We do this by lobby Frag Grenades and spraying the are with machine gun fire.

    3) Once we get to the bunker and clear the enemies, we plant that change ASAP. Once that charge is planted, our Poison Gas Grenadier must throw BOTH of his PGGs at the planted charged. Here is the reasoning. An enemy is going to try to defuse the charge and we have to stop him. Gas makes it more difficult to defuse the charge by weakening the enemy (gas does stack from what I've seen and heard). So if an enemy is trying to defuse, he is losing a lot of health just from gas and it will be easier to take him down with just a few rounds.

    Once we have the bunkers down, we head for that AAA. Similar strategy. Rocketmen take out any enemy Humvees that they placed around the AAA or behind the bunkers. Grenadiers can also help taking these vehicles out and clearing the area of enemies. When that charge is planted on the AAA, gas it up and get out of there.

    Loadouts After the Bunkers are Down
    x2 Anti-Personnel Miners
    x2 Anti-Tank Miners
    x2 Grenadiers/Poison Gas Grenadiers
    x1 Counter Sniper
    x1 Minesweeper

    (Also, this is when APC squads should have a Repairman. Get the APCs somewhere that is close enough to the Transport Vehicles to be protected from fire and ensure that it doesn't go down. Waiting for an APC to respawn and get it back to the frontlines risks too much time. But we also can't have too many Repairmen because we need people pushing for the Transports. Keep the APCs close enough so that there will be 2 Repairmen working on both of them).

    1) AP Miners need to plant mines at key locations to prevent the enemy from rebuilding. Mines near the AAA and mines where enemies pass through the most will prevent them from advancing, but more importantly, let the AP Miners know that the enemy is trying to move forward. AP Mines need to keep the squad informed of these movements.

    2) AT Miners have a similar situation. We can't always get the Motor Pools down, since they are usually right next to enemy spawn points. But we can prevent enemy vehicles from getting to the AAA or Bunkers by placing AT Mines are key locations.

    3) Grenadiers and Poison Gas Grenadiers have to keep the enemy disoriented. Don't be afraid to get close enough to the enemy's spawn points and just lob those grenades as they come out.

    4) On Raven's ACQ especially, there are lots of high places for enemy snipers to pick off our troops. We need a solid Counter Sniper to work against those snipers. As a squad, we need to let our Counter Sniper know where the enemy is hiding.

    5) The Minesweeper is going to help support the squad with an Explosive Detector. The enemy will plant mines to destroy our troops, our APC, and the Transport Vehicles. With the Explosive Detector, the Minesweeper can seek and destroy those mines and everyone around him will also be able to see those mines. Some of the mines will be right in front of the Transport Vehicles, so once those mines are taken out, the Minesweeper can take that Vehicle and drive it home.

    With these loadouts, you can be flexible with your main weapon and you should always be comfortable with what you are firing. As for armor, mobility is important. I wouldn't ban Heavy Armor, but recommend something lighter.


    Now, I also wanted to mention briefly what abilities to have when going into ACQ as an Attacker.

    1) Advanced Explosives. The time it takes to plant a charge without this ability is too long. With this ability, we can plant and get out fast, even faster if the PL is around.

    2) Increased Endurance. We have a lot of ground to cover and need to be able to sprint long distances, especially if you are on the non-ACP squads.

    3)Advance Grenades/Rocket Launcher Reload Speed. Both of these are optional. Lobbing grenades deeper into enemy territory is useful especially in the second phase of the game when we can put pressure on their spawn points. Reload Speed is also useful if we start having trouble with those turrets.

    Like the other post I made, I'm welcome to suggestions and adjustments.
    needswall
    needswall
    Sergeant First Class
    Sergeant First Class


    Posts : 300
    Join date : 2010-03-01
    Age : 44
    Location : Vietnam

    MAG RAVEN Acquisition Attack Strategy Empty Re: MAG RAVEN Acquisition Attack Strategy

    Post by needswall Fri Apr 23, 2010 6:15 am

    My maps now look like they were done with crayons by a 7 year old, ha ha. Does someone want them for their fridge. Joking aside, nice map Raven, good job mate.
    Brashin
    Brashin
    Sergeant First Class
    Sergeant First Class


    Posts : 309
    Join date : 2010-02-18
    Age : 46

    MAG RAVEN Acquisition Attack Strategy Empty Re: MAG RAVEN Acquisition Attack Strategy

    Post by Brashin Fri Apr 23, 2010 8:06 am

    Raven I see your map on this page and when I go to your link I dont see the Raven Acq map. I can see the SVER one though.

    If it's possible I would like to be able to see where each squad and what Platoon they are in spawn on the maps. It would also be great to find out where the Enemy spawn points are located after the bunkers fall. This way perhaps it is possible to send a team to pin them at their spawn point as has been done to us on our own Acq map.

    This is great stuff though I like it.

    Needs your map is fine as well.


    Also for Raven, that's a pretty impressive strategy you have laid out, and for one squad I'm not saying that's asking a lot out of as I have seen what 1 MoV squad can accomplish but we must really be on our game to carry that out.

    I need to do some research and find out what exactly the sensor dish does, I'm sure it points out our position but how effective is it?

    Heero just to add to your post and I'm not sure how I forgot about this but I usually carry smoke grenades. I think we should have at least 1 guy in the squad to either carry smoke or gas. The only issue with smoke is it works both ways, while I have all the athleticism stuff (except parachuting and the resistance to fall dmg) not everyone does so they may be really affected by our own gas. But I do like the thought of having a minesweeper clear the area as I cant tell you how many times I have run up to plant on a bunker and someone in my squad hasn't done the honor of clearing the area of mines for me and I get dusted.

    Which brings up another good point, I see nowhere in Ravens strategy a clear cut plan to keep me alive.

    Keep up the brainstorming guys this is a good discussion and I like where we are heading. I know Acq is a hated game mode of Valor and before I started running Ops on it we rarely if ever played the game mode (at least not when I was in game) so I am pleased to see a lot of thoughts on how we can better prepare for the game mode and I hope that through the Ops I run that we will remove that stigma from Mov of playing ACQ.

    Keep it up guys.
    HeeroBlaze
    HeeroBlaze
    Private
    Private


    Posts : 31
    Join date : 2010-04-07
    Location : USA

    MAG RAVEN Acquisition Attack Strategy Empty Re: MAG RAVEN Acquisition Attack Strategy

    Post by HeeroBlaze Fri Apr 23, 2010 2:10 pm

    Responding to Brashin's post.

    From what I know, the Senor Dish is only used by the Platoon Leader to call in Sensor Sweeps. Sensor Sweeps reveal enemy positions kinda like OIC's Satellite Sweep, but for a much smaller area.

    I personally love Smoke Grenades and don't think they are used enough. I usually use them to prevent any Snipers from seeing where we are. Some of the loadouts like Machine Gunner or Rocketman should have enough room to have Smoke Grenades. As for the Poison Gas Grenade concern, I know it hurts everyone and not everyone has either 120 HP or Chemical Resistance or both. But that's why I wanted there only to be certain situations where Gas is used, such as to protected a planted bunker or to slow down enemy spawning.

    I'm glad you like the minesweeper idea, I hate seeing you get blown up my mines too. And just for everyone's clarification, when disposing of mines, make sure you stand far enough back for the blast not to hit you. AP mines are directional, so if you stand to the side of them you should avoid most of the damage. Also, I hear AT Mines require larger guns to blow them up. I have done it with an LMG, but I don't know if ARs also work, I'm pretty sure a pistol won't. Can anyone clear this up?
    Brashin
    Brashin
    Sergeant First Class
    Sergeant First Class


    Posts : 309
    Join date : 2010-02-18
    Age : 46

    MAG RAVEN Acquisition Attack Strategy Empty Re: MAG RAVEN Acquisition Attack Strategy

    Post by Brashin Mon Apr 26, 2010 1:51 pm

    Another point from last weeks Op was where can we put our own APC's?

    I like what Sotello had implemented which was basically taking one of our APC's and constantly driving it behind enemy lines stopping only occasionally in order to have repairs done. While he did have some APC's on his tail the gunners are usually able to keep them off his tail.

    Also by having Sotello constantly driving around once everyone spawns inside the APC when he completes his next pass then we can all disembark and go for the roadblock/APC's. We should look to perfect this strategy by doing some more field testing and see how viable a tactic this is.
    needswall
    needswall
    Sergeant First Class
    Sergeant First Class


    Posts : 300
    Join date : 2010-03-01
    Age : 44
    Location : Vietnam

    MAG RAVEN Acquisition Attack Strategy Empty Re: MAG RAVEN Acquisition Attack Strategy

    Post by needswall Mon Apr 26, 2010 7:42 pm

    All sounds very guerrilla warfare style tactics... I like it...
    Brashin
    Brashin
    Sergeant First Class
    Sergeant First Class


    Posts : 309
    Join date : 2010-02-18
    Age : 46

    MAG RAVEN Acquisition Attack Strategy Empty Re: MAG RAVEN Acquisition Attack Strategy

    Post by Brashin Tue Apr 27, 2010 6:19 am

    Hey Needs, what no offer to label the map with different numbers, damn
    needswall
    needswall
    Sergeant First Class
    Sergeant First Class


    Posts : 300
    Join date : 2010-03-01
    Age : 44
    Location : Vietnam

    MAG RAVEN Acquisition Attack Strategy Empty Re: MAG RAVEN Acquisition Attack Strategy

    Post by needswall Tue Apr 27, 2010 8:04 pm

    Hmmm... I suppose I could seeing as I am doing the others, but no promises.
    Brashin
    Brashin
    Sergeant First Class
    Sergeant First Class


    Posts : 309
    Join date : 2010-02-18
    Age : 46

    MAG RAVEN Acquisition Attack Strategy Empty Re: MAG RAVEN Acquisition Attack Strategy

    Post by Brashin Wed Apr 28, 2010 5:53 am

    Anything you are able to do is much appreciated, if you don't have time it is completely understandable
    needswall
    needswall
    Sergeant First Class
    Sergeant First Class


    Posts : 300
    Join date : 2010-03-01
    Age : 44
    Location : Vietnam

    MAG RAVEN Acquisition Attack Strategy Empty Re: MAG RAVEN Acquisition Attack Strategy

    Post by needswall Wed Apr 28, 2010 7:39 pm

    Still working on SVER map (should have today) but got the Valor and Raven done last night:

    MAG RAVEN Acquisition Attack Strategy Acquis13
    Brashin
    Brashin
    Sergeant First Class
    Sergeant First Class


    Posts : 309
    Join date : 2010-02-18
    Age : 46

    MAG RAVEN Acquisition Attack Strategy Empty Re: MAG RAVEN Acquisition Attack Strategy

    Post by Brashin Wed Apr 28, 2010 7:41 pm

    Awesome, great job
    needswall
    needswall
    Sergeant First Class
    Sergeant First Class


    Posts : 300
    Join date : 2010-03-01
    Age : 44
    Location : Vietnam

    MAG RAVEN Acquisition Attack Strategy Empty Re: MAG RAVEN Acquisition Attack Strategy

    Post by needswall Wed Apr 28, 2010 7:51 pm

    Bunkers are B1 thru B8 (going left to right across the map);
    Transports are T1 & T2 (going left to right across the map);
    Objectives (AA, mortar, etc.) are A thru J (going left to right then up the map, thought best on this one to have them laid out in this way);
    Gates are Y & Z (going left to right across the map);
    The red x's are blockades;

    For those of you who don't know them, and assuming in game we use the phonetic alphabet for objectives (to ensure clarity), it is as below:

    A = Alpha
    B = Bravo
    C = Charlie
    D = Delta
    E = Echo
    F = Foxtrot
    G = Golf
    H = Hotel
    I = India
    J = Juliet

    Y = Yankee
    Z = Zulu

    Would suggest for clarity the SL / FT leader / whoever is calling the shots for movement makes a statement like "move to objective Echo" or "secure the sensor array at objective Echo".
    Eliteassassin479
    Eliteassassin479
    Admin
    Admin


    Posts : 2270
    Join date : 2009-05-15
    Age : 37
    Location : Illinois

    MAG RAVEN Acquisition Attack Strategy Empty Re: MAG RAVEN Acquisition Attack Strategy

    Post by Eliteassassin479 Fri Apr 30, 2010 6:11 pm

    my rule is pretty simple, everyone move from left to right, not spawning on the APCs, 4 guys go up top, 4 guys go down
    Brashin
    Brashin
    Sergeant First Class
    Sergeant First Class


    Posts : 309
    Join date : 2010-02-18
    Age : 46

    MAG RAVEN Acquisition Attack Strategy Empty Re: MAG RAVEN Acquisition Attack Strategy

    Post by Brashin Mon May 03, 2010 9:38 am

    Hey Elite,

    Can you elaborate some more on this tactic. Assuming you spawn on the correct side based on Platoon, but would be interested to know what the strategy is.

    Also what do you do once you take the 1st bunker, AA or other bunkers?
    needswall
    needswall
    Sergeant First Class
    Sergeant First Class


    Posts : 300
    Join date : 2010-03-01
    Age : 44
    Location : Vietnam

    MAG RAVEN Acquisition Attack Strategy Empty Re: MAG RAVEN Acquisition Attack Strategy

    Post by needswall Tue May 04, 2010 7:49 pm

    Would be good to get some sort of attack routes planned out for this (and the SVER Acquisition, although we have some sort of tactics / attack plan for SVER) so everyone can be on the same page prior to Friday night.
    Brashin
    Brashin
    Sergeant First Class
    Sergeant First Class


    Posts : 309
    Join date : 2010-02-18
    Age : 46

    MAG RAVEN Acquisition Attack Strategy Empty Re: MAG RAVEN Acquisition Attack Strategy

    Post by Brashin Thu May 06, 2010 6:09 am

    Fair enough.

    B1 must be a priority. Team has to spawn on the left side at start of game...not in APC. Once that is down they should make their way they should then make their heading in the direction of the roadblock...no need to blow it up but I want them coming from the 11:00 position and hit bunker B2. From their we hit the AA. I like leaving a FT at the AA to ensure it stays down as it is crucial for us to get those choppers in. While this is going on we need an APC brought up for us to spawn closer. Once the AA goes down the PL should use a strike to knock out B3 if it is not already down. After that we need to make our way in. It depends on how the situation is going on if we need to knock out the other bunker and what resistance is like.

    Again I want to ensure we practice 3-4man rocket teams firing 1 salvo to knock out a turret.
    Brashin
    Brashin
    Sergeant First Class
    Sergeant First Class


    Posts : 309
    Join date : 2010-02-18
    Age : 46

    MAG RAVEN Acquisition Attack Strategy Empty Re: MAG RAVEN Acquisition Attack Strategy

    Post by Brashin Fri May 07, 2010 7:22 am

    2 New tactics created by Elite that I like

    1st when attacking When attacking Bunker B1 we send a FT up the top left side and FT2 approach from the bottom straight up the gut. That way it splits the turret gunners focus.

    2nd even better tactic is to return your OWN APC to the bunker as Elite did last night. It was classic, why bother going after the enemy APC when you can try and pawn your own APC off as the objective...classic..
    Eliteassassin479
    Eliteassassin479
    Admin
    Admin


    Posts : 2270
    Join date : 2009-05-15
    Age : 37
    Location : Illinois

    MAG RAVEN Acquisition Attack Strategy Empty Re: MAG RAVEN Acquisition Attack Strategy

    Post by Eliteassassin479 Fri May 07, 2010 7:46 am

    heres a strategy, make sure you hav the trransport when u are driving back to base
    Brashin
    Brashin
    Sergeant First Class
    Sergeant First Class


    Posts : 309
    Join date : 2010-02-18
    Age : 46

    MAG RAVEN Acquisition Attack Strategy Empty Re: MAG RAVEN Acquisition Attack Strategy

    Post by Brashin Fri May 07, 2010 11:15 am

    That only pertains to you, just like keeping BRASHIN alive pertains to everyone in the Clan..& the PMC for that matter

    Sponsored content


    MAG RAVEN Acquisition Attack Strategy Empty Re: MAG RAVEN Acquisition Attack Strategy

    Post by Sponsored content


      Current date/time is Thu May 09, 2024 6:18 pm